Simple & Easy Steps to Seal Mylar Bags with a Cloth Iron

Mylar bags are great for long-term storage and shelf presentation purposes. If you purchase a product packed in a resealable mylar bag and then it becomes non-operational, this can be intimidating. You may think of getting your food items spoiled and degrading the quality of your perishable products. This can be true, but if you learn the micro-skill of repacking these mylar pouches with the help of an iron, things will get much easier for you.
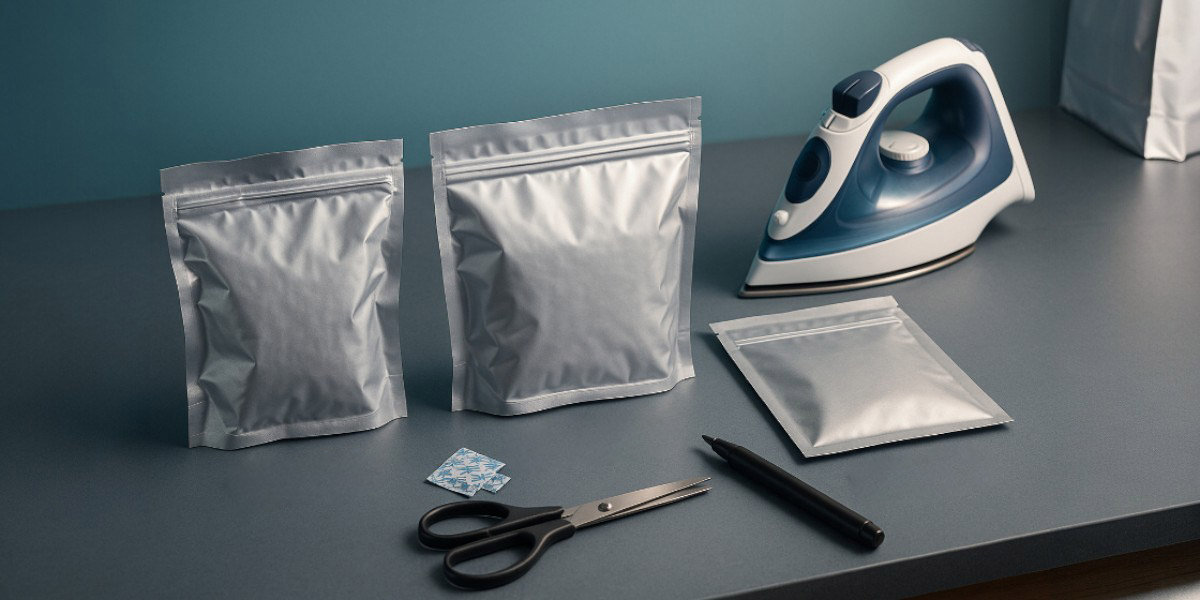
Yes, even if you haven’t tried this trick before, here in this blog, you’ll learn it from scratch and implement it in a hassle-free way. There’s no rocket science in it, all you need is:
- Mylar bags, the ones you want to seal.
- Clothes iron, either automatic or manual settings, no steam required.
- Oxygen absorbers are added to the pouches to absorb the oxygen.
- Flat surface that can be an iron-stand, a kitchen shelf, or a marble piece that can bear the heat of the iron.
- Permanent marker to mention the details about the product, e.g., name and date of packing.
- Scissors to trim the rough endings to get a professional look.
Explore Reasons to Seal Mylar Bags for Food Storage
Before jumping right into the steps to seal mylar bags with a cloth iron, know why sealing mylar bags matters. Here are a few major reasons to seal mylar packaging bags:
-
Remove Total Oxygen
Unsealed bags allow air to circulate, which degrades food quality, oxidizes nutrients, and allows insect eggs to hatch. However, sealing mylar bags allows oxygen absorbers to chemically remove trapped air while creating a vacuum environment.
-
Control Moisture and Humidity
The aluminum foil core in Mylar keeps water out, preventing mold, mildew, and bacterial growth. Otherwise, moisture absorbs inside ingredients while causing mold growth and product spoilage.
-
Block UV and Light Rays
Light breaks down vitamins, alters food flavors, and fades colors. As a result, consumers experience unpleasant eating or consumption. To ensure the pristine condition of your items, the metallic exterior of sealed bags blocks all forms of light.
-
Resist Pest and Other Contaminants
Ever found rodents and insects chewing standard plastic bags or paper containers easily? If yes, that’s not the case with mylar bags. The reason is that Mylar is tough and tear-resistant, keeping out external contaminants.
-
Contain Odor and Preserve Aroma
If you sell perishable items like creams, food, or cosmetics, how they smell creates a significant impact on customers. That’s where sealing bags step in by preventing external odors from ruining the taste of your food and stopping the internal aroma from attracting pests.
Practical Steps to Seal Any Mylar Bag with Iron
Once you’re ready, it’s time to follow practical steps to seal the mylar bag with perfection.
Step 1: Prepare the Space
First of all, make your space and ensure you have the necessary items at your bay. A rectangular or square-sized solid board is enough to perform this task without obstruction. While setting the iron to a medium setting, not high, nor low, as it will not bring the desired outcome. Also, it should be in dry mode, cotton settings at 400°C, as steam can melt down thesealable mylar pouch’s sheet.
Step 2: Fill the Bag with Content
Now, add the product you want to preserve, or if it’s already inside, let it settle down, and don’t pour away from the opening end. Add the oxygen absorber and then attach both sides. Press the empty area in a way that it pulls out the air outside, and there’s no room left behind.
Thus, seal the ends into two layers for a temporary seal to restrict the air passage and hold it by laying the bag down on a flat surface.
Step 3: Iron the Bag Shut
Thirdly, grab the iron in one hand and slide it from one corner of the pouch to the other. Move the iron slowly but not too slowly as it starts burning the mylar film. For thin mil layers, it will merely take a single slide of the iron. But for the thick layers, you may have to iron it more than once to ensure the ideal seal is developed.
Step 4: Recheck the Seal
That’s it! Now don’t touch the sealed area immediately, as it can be damaged. Wait for a while to let it cool down. After that, grab the pouch and keenly observe the sealed spot. If everything seems fine, you’re good to go. If not, then repeat the iron cycle again.
Lastly, you can perform two quick tests to check the seal’s strength. Either by squeezing the pouch to notice any leaks or dipping it in the water to see if any bubbles are escaping from the wrapped spot. You can also read from our comprehensive guide on how to properly seal Mylar bags to learn the other ways.
Wondering How Long Dehydrated Food Lasts in Mylar Bags?
After exploring simple and easy steps to seal mylar bags with a cloth iron, get to know how long you can keep dehydrated food fresh. By pairing with oxygen absorbers, sealed bags keep your food fresh for 10-30 years. This dramatic shelf life is realistic when Mylar completely blocks out oxygen, light, and moisture, which are the primary causes of food degradation.
Tidbit: Keep in mind, storage duration really depends on the food type.
Situation to Benefit from Iron Sealing for Mylar Bags
There are multiple occasions when you use this DIY technique to reseal your perishable products if they are never unpacked. Some of the scenarios you may go through are:
- When the integrated seal got torn from its original placement, and even after closing it, the pouch remains open. For this, you can’t make the pouch function as new, but you can repack it smartly.
- When the zipper becomes dysfunctional and doesn’t work as it should. Rather than juggling with the zipper, it’s best to iron-seal it instantly to save your time and effort.
- If the pouch you’re using doesn’t have a resealability feature by default. Then you can utilize this method to also seal it like a new pouch. This will reduce your costs for packaging and also ensure that the product is packed in an air-tight environment.
Other Simple Ways to Seal Mylar Bags
For an ideal sealing of mylar bags, commercial sealers are second to none. One of the popular alternatives and simple tools to seal mylar bags is a cloth iron. Yet, you can consider the hair straightener, impulse hand seal, and aluminum foil barrier. All these are great choices to seal mylar bags at a small scale for an instant solution to your product's packaging.
Mylar Bags vs. Vacuum Bags: Which Works Best for Food Storage?
Mylar bags are the gold standard for long-term food storage, such as 10–25+ years, because they provide a total barrier against light, moisture, and oxygen. On the other hand, vacuum bags are best for short-term pantry storage, freezing meats, and compressing fresh, moist, or frequently rotated items for up to 1–3 years.
Why Does Sealing Method Still Work When Everything Else Fails?
Since you have explored simple & easy steps to seal mylar bags with a cloth iron, wondering why it works. This is because the sealing method creates a completely impenetrable barrier against the three primary drivers of food spoilage: oxygen, light, and moisture. Consider several reasons why sealed mylar methods succeed when other methods fail:
-
Zero Oxygen Transmission
Standard rigid containers and conventional vacuum bags can slowly let microscopic amounts of gas seep in over time. Mylar bags include an aluminum foil core, which stops gas exchange entirely. When paired with oxygen absorbers, internal oxygen is reduced to less than 0.1%, creating an environment where bugs and mold cannot survive.
-
Total Light Blockage
Ultraviolet (UV) rays trigger lipid oxidation, which spoils the nutritional value and flavor of food. Mylar packaging is completely opaque while protecting the food from the chemical-altering effects of light.
-
Thermoplastic Fusion
The sealing process works via thermoplastic fusion, which is melting the inner polyethylene lining to itself. This depends on simple heat and pressure to create a hermetic closure. Because you can apply this heat using simple tools like a standard clothes iron or a hair straightener, the method is highly resilient even if the power grid fails or specialized machinery breaks down.
The Iron Line
We hope you’re now equipped with the knowledge to seal the Mylar bags with the help of an iron. Since there are other ways too, but this one requires no prior skill or expertise at all. Since this can be confusing, as if you’re doing it for the first time. You may fear ruining your pouch, which is possible if you don’t follow the mentioned steps accordingly.
But no need to worry. We suggest you try this practice on the used mylar bags you’re going to trash. This way, you’ll practice this DIY skill and also ensure that there’s no pristine pouch being experimented with. Win-win? Now it’s your turn to try it and share this technique with those who always throw away their Mylar bags because they have no technique to reuse them.
If you’re doubtful about whether the seal is intact or not, then once you iron it. Dip the bag in water to form the upper sealed side and see if any bubbles pop up. If it happens, then there is some spot left un-ironed, causing the air to travel from inside to outside and vice versa.
The ironing can take only 2-5 seconds to develop a durable and permanent seal. While the whole task may take no more than a couple of minutes to perform.
The ironing can take only 2-5 seconds to develop a durable and permanent seal. While the whole task may take no more than a couple of minutes to perform.
