What is a Dieline in Packaging & Printing? Learn Quickly!

Consider yourself as a handcrafted soap brand launching new, delicate, uniquely shaped artisanal soaps, and need custom soap boxes. In this case, “dieline” is a tailor which ensure the custom shape, structural integrity, and perfect placement of branding elements.
Launching a new product is exciting until it‘s time to design custom packaging, which can be an exaggerated task. Thanks to Deline, this task can be fulfilled without an inch of error, material waste, design misalignment, or cost discrepancies. Investigate the blog before launching your product!
What is a Dieline?
A dieline in packaging acts as a blueprint for a box. For instance, rigid boxes have a hard and sturdy texture, making cutting and forming a challenging task. That’s where dieline applies, to create any physical form of packaging, a designer or manufacturer first starts by creating a 2D layout using software like Adobe Illustrator or specialized CAD programs.
The procedure includes visual elements such as fold lines, crease lines, and bleed lines. This layout ensures precision, consistency, and structural integrity before the physical form is produced. Through this flat construction, you know which panels will connect and create a box-style shape without any error.
What is a Dieline in Packaging?
Dieline serves as a universal language between designers, clients, and manufacturers. Dieline in packaging refers to a roadmap for turning flat visual art into a perfect 3D package, incorporating technical specs like bleed and trim for seamless production. Discover how the Pacdora tool simplifies designing dielines for packaging.
Why You Need a Dieline Before Manufacturing?
Dieline is the window to the actual production of any package. Let’s learn why your product needs it:
Package Precision, Consistency & Right Artwork Placement
Dieline provides precise measurements in Outlook for every cut, fold, flap, and glue tab, as well as the top and bottom sections. This method eliminates any uncertainty about whether the artwork will be printed correctly, ensuring that it does not exceed the designated areas. As a result, every piece produced in mass production will be identical and meet the required structural standards.
Error Detection & Removing Errors
By using a dieline illustration, designers can review digital mock-ups multiple times, so there is no chance of error within designs, structure, typography, or dimensions before finalising the package. This process can save both manufacturers and designers significant time and money.
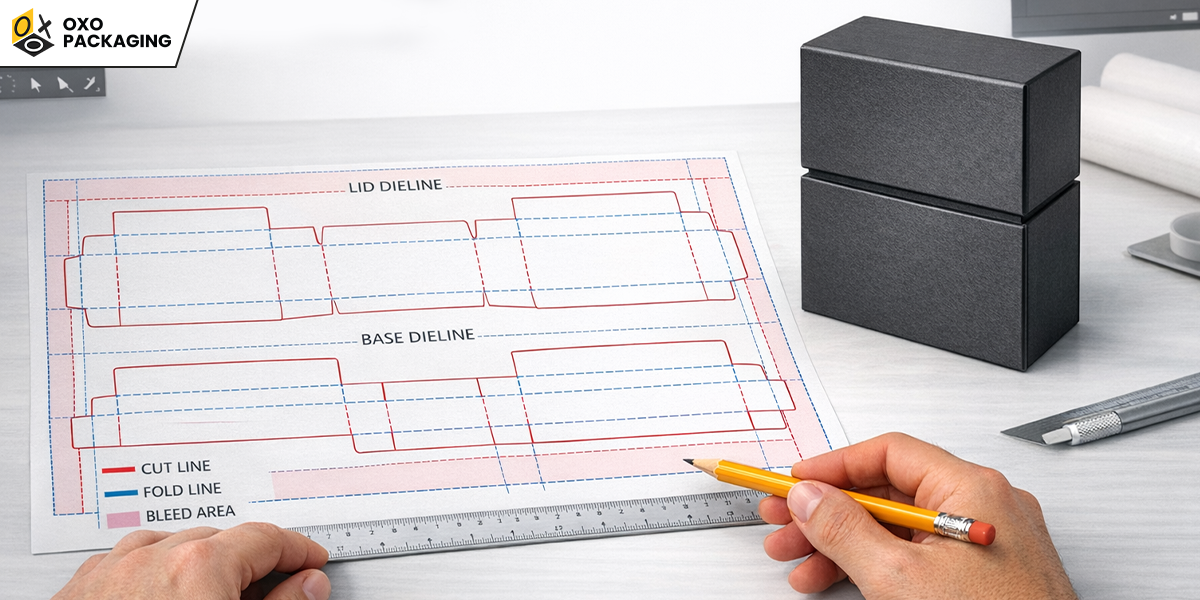
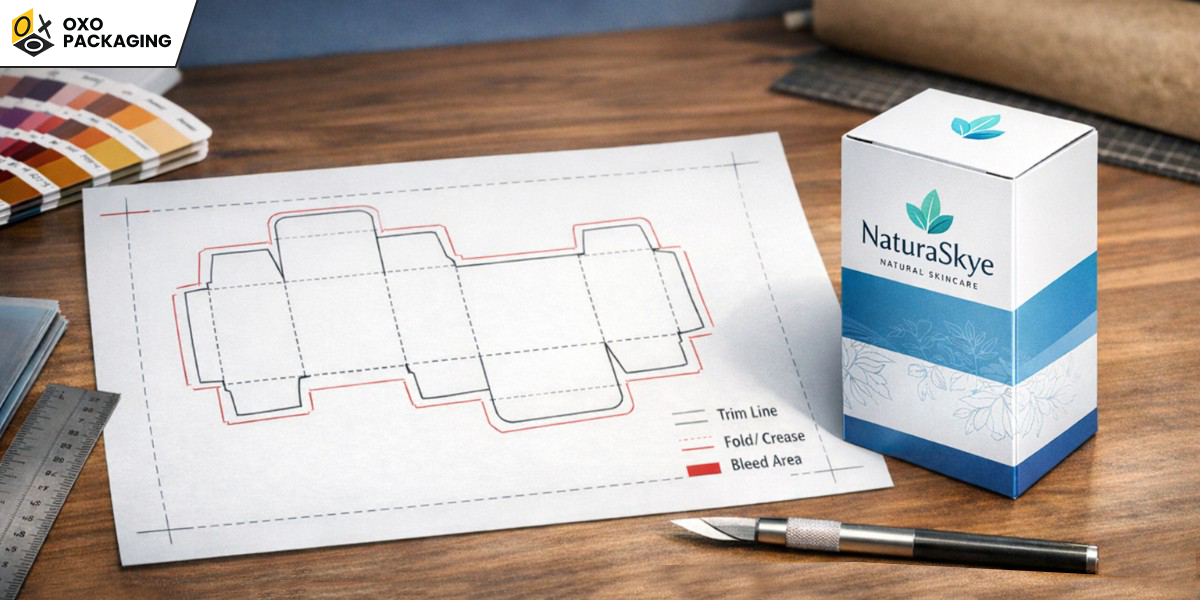
Components of Dieline & How to Read it
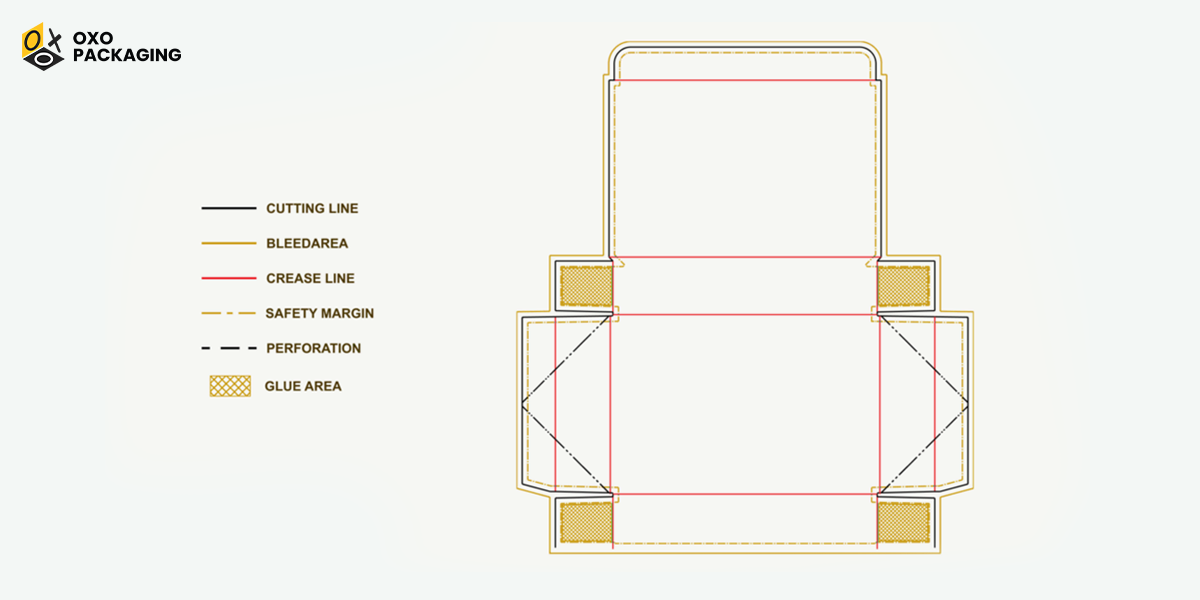
To read a dieline, you must first understand the purpose of the various lines and colours, which indicate where to cut, fold, and glue your packaging.
Cut Lines(Trim Black Line)
Cut lines are shown as black lines, which indicate where the cutter will cut the flat sheet, through which the physical form will form. These guidelines assist in accurately cutting and mapping the package before the physical production process.
Fold lines(Crease Red Line)
Fold lines are indicated by red lines, showing where to lightly cut and crease to fold the package into its 3D format.
Bleed Lines(Black Line)
Bleed lines, indicated by a black colour, represent the area beyond the printing boundary. This ensures that background colours and images extend past the cut line, preventing white edges from appearing if the cut shifts.
Safe Zone(Blue Dotted)
Safe zone lines, shown as blue or green lines, indicate a safe zone for graphic elements such as logos, texts, artwork, and visuals that must stay under this line to avoid being cut off or hidden.
Glue Tabs
Glue tabs marked with a criss-cross pattern indicate where adhesives are applied to secure the package's final construction.
How to Make a Dieline?
Making a dieline from scratch may feel like a challenging task; however, if you are a designer or a business owner who wants to experiment first before consulting a professional. Here’s what you need to do to create a dieline on your own:
Find any box in your surroundings? Take it, unfold the tabs, and flatten it, then trace its outline, feel the flaps and crease line that joins the structure. Feel it? Now measure it using a scale. These measurements will assist you in creating your own dielines.
In the next step, you'll need software such as Adobe Illustrator or another tool of your choice. Use the pen tool to create precise cut lines, add layers, and incorporate your artwork. Be sure to select the dieline stroke and set its attribute to "Overprint Stroke."
Another easy and convenient method is if you have a similar box, follow the upper instruction and measure the dimensions of the box(Length, width, height) and use those measurements in the generator or Illustrator to create a dielines of your product packaging.
Ready to Create Your Product Packaging?
To create perfect and precise bulk packaging, a balanced dieline is essential. This ensures that each piece is identical and convenient. That’s why OXO Packaging offers comprehensive services and guidance at every step of the manufacturing process. We help you produce excellent quality packaging that will impress your consumers, just as we do!
A dieline is an important 2D template or blueprint, usually in a vector file, that shows the exact cut, fold, and bleed lines to create a flat piece of packaging.
A dieline is a 2D template, or "blueprint," that shows printers how to cut, fold, and glue a package's flat layout to form a 3D product packaging.
In Adobe Illustrator, a dieline is a non-printing vector template layer that acts as a blueprint for a physical product, showing exactly where it needs to be cut, folded, creased, or perforated.
It supports designers and manufacturers to create the perfect shape of boxes using all three components of the dieline (fold lines, crease line, bleed line).
A dieline is a flat, 2D technical blueprint showing where to cut, fold, and glue packaging for manufacturing, while the mockup represents it in a 3D mockup of the final look.
